Step 11: Process Flow
ProcessFlow on the
Production Process page.In the last steps, you have implemented the user interaction handling to allow navigation from
the Production Process tile to the ProcessFlow
view. With the Production Process tile, you have an aggregated
view of the progress of the production process. Therefore, a detailed overview of the
current production status is generated in this step. You will add the production flow,
the states of the manufacturing steps, their dependencies, and critical steps, if
necessary.
First, add the ProcessFlow control to this view, so that you can see the
current status of the production process. The production process consists of six steps
represented by the following ProcessFlowLaneHeaders:
-
Order
-
Manufacturing
-
Assembly
-
Marketing
-
Delivery
-
Payment
The ProcessFlowLaneHeaders use icons that stand for the meaning of the lanes.
The lane headers aggregate the status of the nodes that are assigned to a particular
lane. Each lane consists of ProcessFlowNodes that describe an activity
in this production step. The structure of the nodes and their relationships for
ProcessFlow are defined in the
ProcessFlowData.json file.
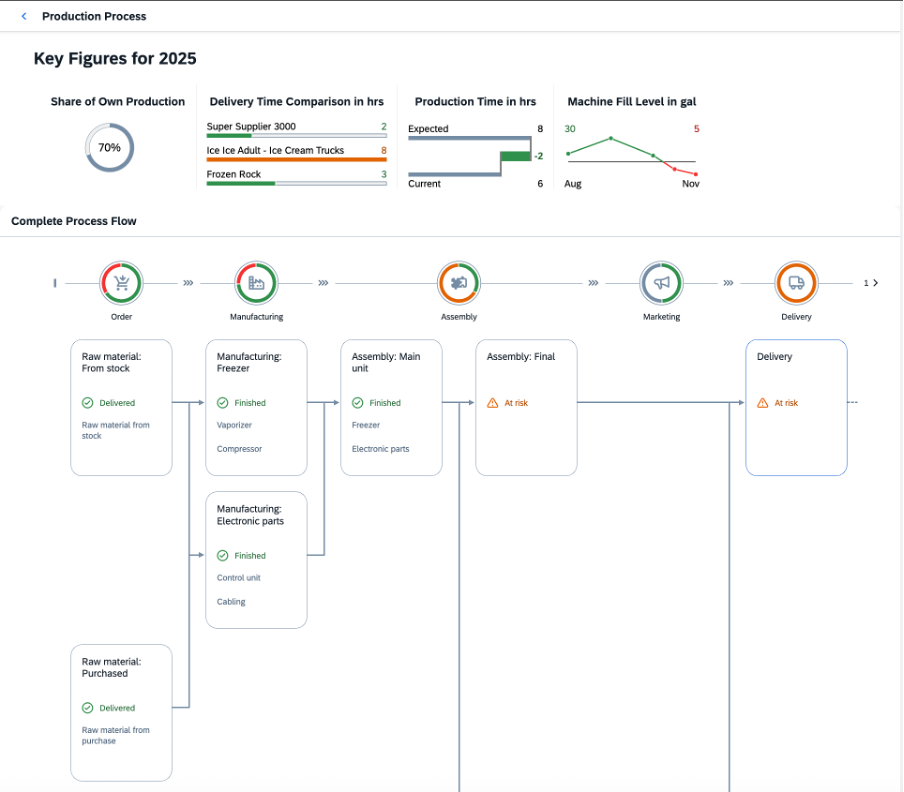
The header area of the ProcessFlow must contain a
HeaderContainer with four micro charts that provide the following
information:
-
Share of Own Production (your own production rate)
-
Delivery Time Comparison in h (comparison of suppliers' delivery time)
-
Production Time in h (comparison of expected and current production times)
-
Fill Level in lb (displays the fill level changes over time)
Preview
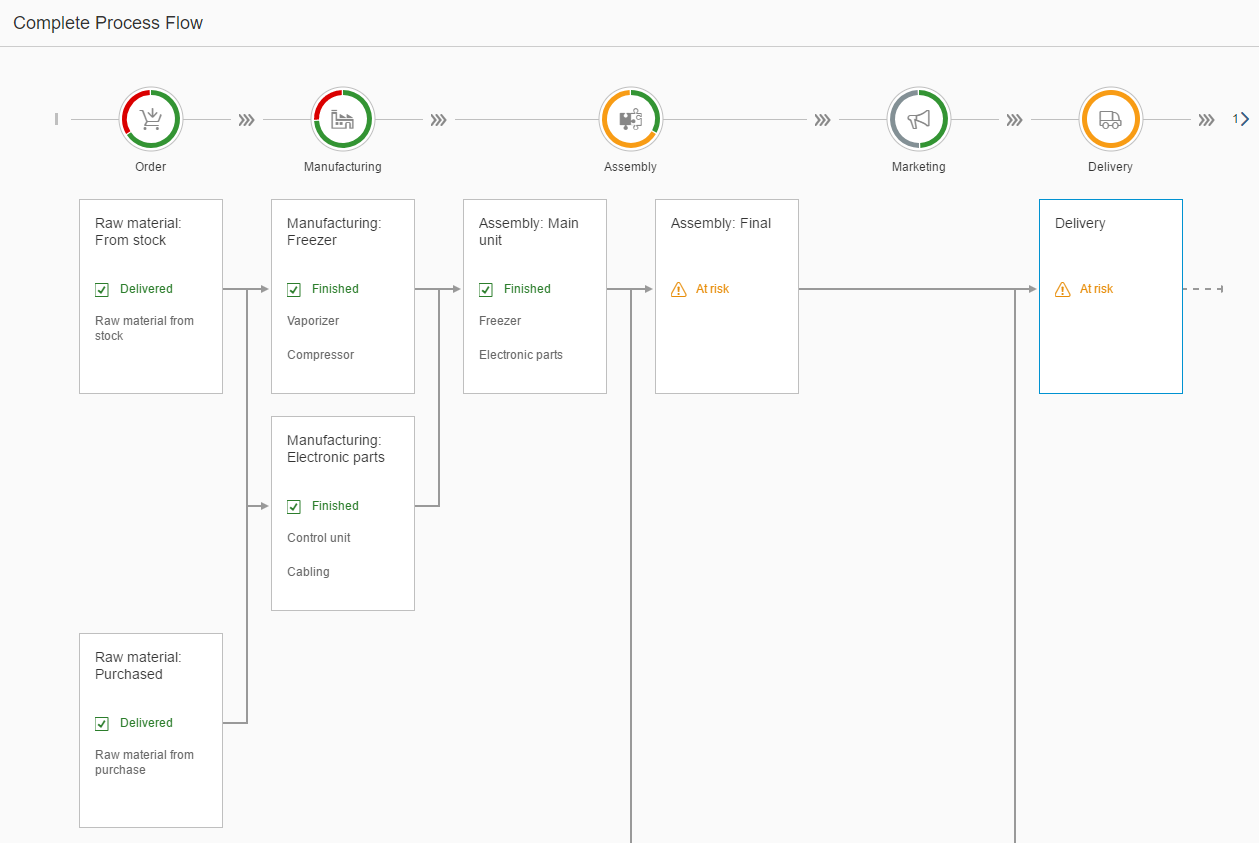
ProcessFlow
The ProcessFlow in the center of the page is used to visualize the current state
of the production process. Each production step is represented by a lane. The colors
of the state segments of ProcessFlowHeader are calculated
internally according to a ProcessFlowNode of a lane. The following
semantic colors are used:
-
Grey for Neutral
-
Green for Good
-
Orange for Critical
-
Red for Error.
The Assembly lane in the middle is a merged lane that consists of nodes that are bound together by a parent-child relation. As a result, the usual width is doubled.
The ProcessFlowNode elements Spare parts: Purchased and
Delivery are highlighted (refer to the
focused property on the API). They are of high interest
as their states are critical.
ProcessFlow.view.xml
You can view and download this step in the Demo Kit from the Ice Cream Machine - Step 11 - Process Flow.
<mvc:View
    ...
            <m:ObjectHeader
                ...
                <m:headerContainer>
                    <m:HeaderContainer
                        ...
                    </m:HeaderContainer>
                </m:headerContainer>
            </m:ObjectHeader>
            <m:Panel headerText="{i18n>processFlowProcessTitle}">
                <ProcessFlow
                    id="processflow1"
                    scrollable="false"
                    nodes="{process>/Nodes}"
                    lanes="{process>/Lanes}"
                    nodePress=".onNodePressed">
                    <nodes>
                        <ProcessFlowNode
                            laneId="{process>lane}"
                            nodeId="{process>id}"
                            title="{process>title}"
                            titleAbbreviation="{process>titleAbbreviation}"
                            children="{process>children}"
                            state="{process>state}"
                            stateText="{process>stateText}"
                            texts="{process>texts}"
                            highlighted="{process>highlighted}"
                            focused="{process>focused}"/>
                    </nodes>
                    <lanes>
                        <ProcessFlowLaneHeader
                            laneId="{process>id}"
                            iconSrc="{process>icon}"
                            text="{process>label}"
                            position="{process>position}"/>
                    </lanes>
                </ProcessFlow>
            </m:Panel>
        ...
</mvc:View>
First, you must add a ProcessFlow control to your view. By setting the
scrollable property to false, the
ProcessFlow uses the default browser scrolling.
Next, bind the nodes and lanes aggregations. Templates are
added to the corresponding aggregations (nodes and lanes).
The template for ProcessFlowNodes is created using the following properties:
-
The
laneIdthat is a unique identifier for the lane the node belongs to. -
The
nodeIdthat is the current node identifier. -
The
childproperty that defines the parent-child relation to other nodes using theirnodeIds. -
The
stateproperty that determines the property of the node and influences the aggregated state of the lane directly.
The next template for the lanes is created using a ProcessFlowLaneHeader with a
laneId that you have from the ProcessFlowNode.
The iconSrc property of the ProcessFlowLaneHeader
accepts any icon. The text after the state of the
ProcessFlowLaneHeader is set with the text
property of the lane header. The order of the lanes is defined by the
position property of the lane header.
ProcessFlow.controller.js
sap.ui.define([
    "sap/ui/core/mvc/Controller",
    "sap/m/MessageToast",
    "sap/base/strings/formatMessage"
], function (Controller, MessageToast, formatMessage) {
    "use strict";

    return Controller.extend("sap.suite.ui.commons.demokit.tutorial.icecream.11.controller.ProcessFlow", {
        ...
        onNodePressed: function (oEvent) {
            var sItemTitle = oEvent.getParameters().getTitle();
            MessageToast.show(this.getResourceBundle().getText("processFlowNodeClickedMessage", [sItemTitle]));
        },

        getResourceBundle: function () {
            return this.getOwnerComponent().getModel("i18n").getResourceBundle();
        }
    });
});
The onNodePressed event listener is set on the onNode event of the
ProcessFlow. It is called when you click on the
node. The title text of the node is displayed
in the message toast.
Preview of the final ProcessFlow
This is the final view of this page:
Parent topic: Ice Cream Machine Tutorial
Previous: Step 10: Line Micro Chart
Next: Step 12: Timeline