How to Test SAPUI5 Controls with QUnit
Comprehensive overview of QUnit testing for controls.
- When writing QUnits, always keep your tests atomic.
- That means: don't rely on the execution of previous tests.
- Don't introduce globals, destroy controls after creating them.
- Only test one single thing.
- When writing a test, always make sure you break it first: don't rely on tests that have never failed!
- Write human readable tests - use descriptive names for variables. Readability > performance. You don't have to write a reuse for everything: it's ok to repeat yourself in unit tests if it helps readability.
- Don't test too many internal aspects: try to test the control like an application or user will use it.
- You have to find a balance between not stubbing / expecting too much of the internal aspects and not doing it at all. If you tightly couple your test to the implementation, maintenance will be a pain.
- If your test is too long, you're squeezing too much stuff into one of your control's functions: divide the complexity, then your test will be simpler and your productive code will be better.
- Don't test general SAPUI5 functionality: only test things actually done by your control (see "What Should You Test?" below).
- Never write an if in a test: it is a sign that you're either not stubbing correctly or you're testing multiple things in one test.
- Never use the expect QUnit statement: you should always write your test in a way that every assertion you set up will be hit 100%.
- Whenever you encounter a Bug/Ticket, start by writing a QUnit that fails first, and then fix the code.
- Write your tests as small as possible: don't add a statement that is not needed for the test, such as an id in controls, constructor properties.
- Use fake timers to avoid as many async tests as possible.
- Don't test the exact same thing multiple times.
- Use modules for grouping your tests: this will give you a better organizational test setup.
- You may use modules for setup/teardown, but don't overuse this feature: if you have a longer module, you might not see what the test does because you don't know its setup.
- In this case it's sometimes better to write code multiple times.
- Don't set up your system being tested in the setup/teardown: it is very rare that all tests in a module have the same constructor. Furthermore, using a global constructor object is dangerous.
If you stick to these rules, you will find it much easier to refactor/maintain your tests. Keeping the tests atomic will make debugging much easier, because you will hit your breakpoints for the code being tested only. If you write QUnits without keeping to these rules, you may well not notice anything bad to begin with, but you will eventually end up in the middle of a maintenance nightmare!
Internally, we use three templates for testing. The one shown below is the general control template. If you are using eclipse, a description of how you can import the templates is included at the end of this section.
Use the following pattern to structure your tests. If everyone sticks to this same pattern, you will be able to read your colleagues' tests very quickly:
#!js
test("Should do Something", function() {
    // Arrange

    // System under Test
    var oMyControl = new nameSpace.myControl({
    });

    // Act

    // Assert

    // Cleanup
    oMyControl.destroy();
});
Arrange
In Arrange, you should set up the dependencies and options you need for your System under Test.
Examples:
- The constructor object of your control
- Sinon spies/stubs and mocks (dependencies of your System under Test)
- Model
System under Test
In System under Test, you should create your control and you should also render it if you want to test the rendering.
Act
Ideally, this part is only one single line of code executing the function you want to test.
Assert
This part may contain multiple statements of QUnit assertions, but ideally not too many in total.
Make sure that you also test negative paths, not only the expected ones.
Optional: Cleanup
Here you should destroy all the controls/models you created.
If you don't use sinon sandboxes, revert all the spies/stubs/mocks.
- Test all the public functions you introduced.
- Test all the overwritten getters and setters.
- Test your control's events and how often they are called.
- Test all possible user interactions (tap, keyboard, focus).
- You could test how often your control gets rerendered when interacting with it, but only if you are worried that it might be rerenderd too often or not at all.
- Test RTL if you have special things done in javascript.
- Write some integration tests if you have a composite control (don't cover 100% of your child controls - that's overkill and child controls will be hard to maintain).
- You may test default values of properties, since we cannot change them backwards compatible and a test will recognize this.
- Test how your control interacts with models (OData + Json).
- Test the destruction of your control when working with composites, test if all dependencies/events are unbound on destruction.
- Never test non-overwritten getters and setters (these are tested in the core of the framework).
- Never test your complete css with computed styles: just check if the classes are set correctly. Focus on testing javascript.
- Never test other generic framework functionality: focus on your control.
In the rendering tests part, you have to place your control to the DOM. The best place to put it is the qunit-fixture div, since its content gets deleted after every test.
Make sure you destroy your control, since SAPUI5 will keep a reference to it and may also rerender it.
It's crucial that you call sap.ui.getCore().applyChanges() after every time you have caused a rerendering.
The call to this function synchronizes the changes of your control with the DOM. If you do not make this call, the DOM will not be updated.
You can use the following template to make sure that you don't forget to destroy your control:
#!js
test("Should do Something", function() {
    // Arrange
        var oContructor = {

    };

    // System under Test
    var oMyControl = new nameSpace.myControl(oContructor);
    oMyControl.placeAt("qunit-fixture");
    sap.ui.getCore().applyChanges();

    // Act

    // Assert

    // Cleanup
    oMyControl.destroy();
});Sinon Fake Timers
If you are using sinon.qunit, it will automatically use fake timers by itself. Fake timers will prevent any setTimeout/setIntervall function from being executed, unless you call this.clock.tick(milliseconds) in your test. This means that a Mock Server with autorespond will not respond and OPA will not be able to wait for controls.
In addition, control events might be fired inside of a setTimeout(, 0), so the event might not be triggered at all.
Testing SAPUI5 Control Events with Sinon
If you want to test SAPUI5 events, you can use spies to test how often they are called. If you try to test the parameters, however, you cannot do this with spies as SAPUI5 uses an eventPool that reuses the same object again. This means that after an event is set, all of the parameters will be deleted, Sinon will keep a reference to the object without properties.
The effect of this is that you cannot assert on them anymore. The workaround is to use a stub with a custom implementation that saves a copy of the parameters to your test function scope.
An example of this is shown in the cookbook below (events).
I set a property on my control: Why aren't the changes in the DOM?
The most likely reason for this is that sap.ui.getCore().applyChanges() was not called. SAPUI5 does not render synchronously, but calling this function will render immediately.
Test Cases
You can use a factory function. To keep this pointer and have a descriptive message, you should use the test inside of the function and pass a test name to it.
Internally, we prefer to pass an object to the test for retrieving the values - it makes the test cases readable.
#!js
function renderBarInPageTestCase(sTestName, oOptions) {
    test(sTestName, function () {
        // System under Test
        var oBar = new sap.m.Bar();

        oBar.placeAt("qunit-fixture");

        // Act
        oBar.applyTagAndContextClassFor(oOptions.context);

        sap.ui.getCore().applyChanges();

        // Assert
        strictEqual(oBar.getDomRef().nodeName, oOptions.expectedTag.toUpperCase());
        ok(oBar.$().hasClass(oOptions.expectedClass), "The bar has the context class: " + oOptions.expectedClass);

        // Cleanup
        oBar.destroy();
    });
};

renderBarInPageTestCase("Should render the header context", {
    context : "header",
    expectedTag : "header",
    expectedClass : "sapMHeader-CTX"
});

renderBarInPageTestCase("Should render the header context", {
    context : "subheader",
    expectedTag : "header",
    expectedClass : "sapMSubHeader-CTX"
});

renderBarInPageTestCase("Should render the header context", {
    context : "footer",
    expectedTag : "footer",
    expectedClass : "sapMFooter-CTX"
});
Testing Control Events
As mentioned in the pitfalls above, you cannot test for event parameters in SAPUI5 so you have to record them. Nevertheless, you can still use Sinon to retain the spy's call counting capabilities. Here is a working example for this:
#!js
test("Should set the Hash", function() {
    //Arrange
    var aCalls = [],
        fnHashChanged = function(oEvt) {
                 aCalls.push({ newHash : oEvt.getParameter("newHash"), oldHash : oEvt.getParameter("oldHash") });
        },
        oSpy = this.spy(fnHashChanged);


    //System under Test
    var oHashChanger = new sap.ui.core.routing.HashChanger();
    oHashChanger.init();
    oHashChanger.attachEvent("hashChanged", oSpy);

    //Act
    oHashChanger.setHash("one", true);
    oHashChanger.setHash("two");

    //Assert
    strictEqual(oSpy.callCount, 2, "did change the Hash two times");

    strictEqual(aCalls[0].newHash, "one", "first event was correct");
    strictEqual(aCalls[1].newHash, "two", "second event was correct");

    //Cleanup
    oHashChanger.destroy();
});
Testing User Interactions
When testing user interactions, you can use sap.ui.test.qunit to trigger events.
Here is an example for when a user presses escape on the select:
#!js
test("Should close the popup menu if it is open and you press escape", function() {
    // Arrange
    var oContstructor = {
        items: [
        new sap.ui.core.Item({
            key: "0",
            text: "item 0"
        }),

        new sap.ui.core.Item({
            key: "1",
            text: "item 1"
        })
       ]
    };

    // System under test
    var oSelect = new sap.m.Select(oContstructor);

    oSelect.placeAt("select-content");
    sap.ui.getCore().applyChanges();

    // Arrange after rendering
    oSelect.focus();
    var fnEscapeSpy = this.spy(oSelect, "onsapescape");
    var fnCloseSpy = this.spy(oSelect, "close");

    // Act
    sap.ui.test.qunit.triggerKeydown(oSelect.getDomRef(), jQuery.sap.KeyCodes.ESCAPE);

    // Assertion
    strictEqual(fnEscapeSpy.callCount, 1, "onsapescape() method was called exactly once");
    strictEqual(fnCloseSpy.callCount, 0, "close() method is not called");

    // Cleanup
    oSelect.destroy();
});
Testing the Rerendering
In this example, you will test to see whether the control fails to rerender. The control has overwritten the setter of the tooltip property to avoid triggering a rerendering.
To test this, we add an eventDelegate to see how often the rendering function is called. We need to make sure that we apply the changes after setting the property because we want SAPUI5 to render synchronously:
#!js
test("Should supress rerendering when tooltip is set", function() {
    // Arrange
    var oContructor = {
        tooltip : "foo"
        };
    var oRerenderingSpy = this.spy();

    // System under Test
    var oLabel = new sap.m.Label(oContructor);
    oLabel.placeAt("qunit-fixture");
    sap.ui.getCore().applyChanges();

    oLabel.addEventDelegate({
        onBeforeRendering : oRerenderingSpy
    });

    // Act
    oLabel.setTooltip("bar");
    sap.ui.getCore().applyChanges();

    // Assert
    strictEqual(oRerenderingSpy.callCount, 0, "Did not rerender");
    strictEqual(oLabel.getTooltip(), "bar", "Tooltip property got set");
    strictEqual(oLabel.$().attr("title"), "bar", "Tooltip got updated");

    // Cleanup
    oLabel.destroy();
});
Testing with Models
When testing with models, you need to make sure that you also setup/destroy your model inside a test itself. OData tests will always be integration tests, since you will require multiple files in order to use the Mock Server. You may use a factory method to do this.
An example for setting up the Mock Server is shown below:
#!js
jQuery.sap.require("sap.ui.app.MockServer");
jQuery.sap.require("sap.ui.model.odata.ODataModel");

function startMockServer(iRespondAfter) {
    // configure respond to requests delay
    sap.ui.app.MockServer.config({
        autoRespond : true,
        autoRespondAfter : iRespondAfter || 10
    });

    // create mockserver
    var oMockServer = new sap.ui.app.MockServer({
        rootUri : "http://sap.com/service/"
    });

    // start and return
    oMockServer.simulate("data/metadata.xml", "data");
    oMockServer.start();
    return oMockServer;
}

//Your test:
asyncTest("Should do something with the model", function() {
    //Arrange
    var oMockServer = startMockServer(0)

    // System under Test + Act

    //Cleanup
    oMockServer.stop();
});
When using the Mock Server, you can use async tests since calling respond each time on the Mock Server does not help the readability of the test.
After setting up the Mock Server, we set up the model as follows:
#!js
function createODataModel(sURL, mSettings) {
    sURL = sURL || "http://sap.com/service/";
    var oModel = new sap.ui.model.odata.ODataModel(sURL, true);

    mSettings = mSettings || {};
    jQuery.each(mSettings, function(sProperty, vValue) {
        sProperty = jQuery.sap.charToUpperCase(sProperty);
        oModel["set" + sProperty](vValue);
    });

    return oModel;
}

//Your test:
asyncTest("Should do something with the model", function() {
    //Arrange
    var oModel = createODataModel(),
        oMockServer = startMockServer(0);

    // System under Test + Act

    //Cleanup
    oModel.destroy();
    oMockServer.stop();
});
You can now bind your model against your control and test whatever you want.
We use clock.tick to trigger the server response. If we did not do this, the text of the label would still be empty:
#!js
//Your test:
asyncTest("Should do something with the model", function() {
    // Arrange
    var oModel = createODataModel(),
        oMockServer = startMockServer(50);

    // System under Test
    var oLabel = new sap.m.Label({
        text : "{/myProperty}"
    });

    oLabel.placeAt("qunit-fixture");
    sap.ui.getCore().applyChanges();

    // Act - trigger the request
    this.clock.tick(50);

    // Assert
    strictEqual("myExpected", oLabel.getText(), "The expected text was present");

    // Cleanup
    oModel.destroy();
    oMockServer.stop();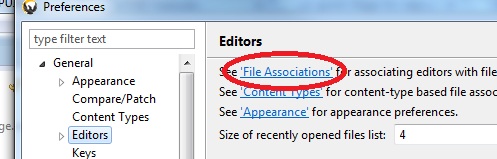
});If you are using eclipse, to import the templates start by calling up Preferences as shown below:

Make sure that you have added the JavaScript Editor to the File
Associations under  General
  Editors File Associations
 :
:
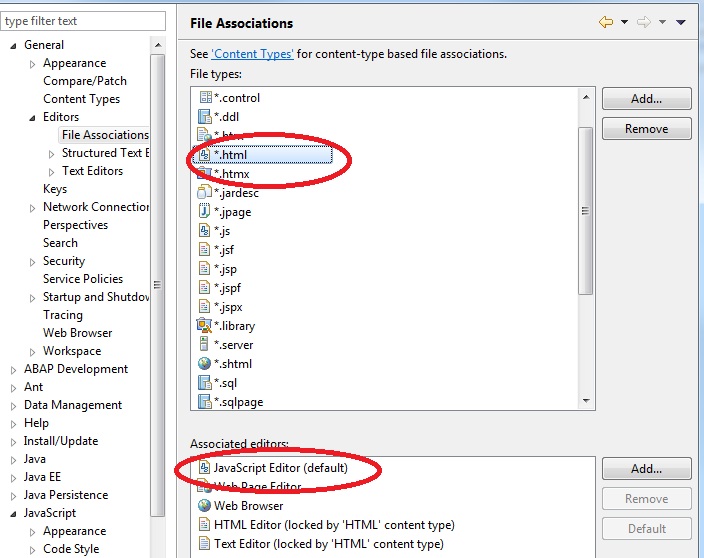
You can do this by choosing the File Associations link on the Editors start page, then selecting *.html from the top list and adding JavaScript Editor as an associated editor:
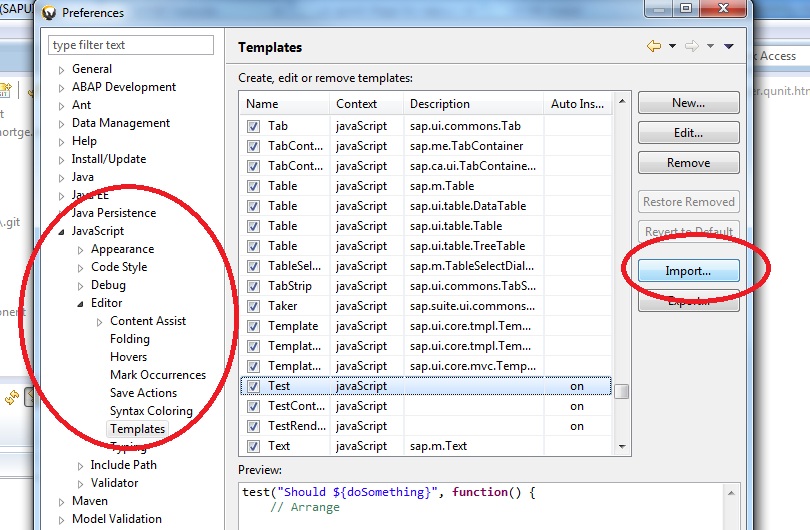
While still in the Preferences, navigate to JavaScript Editor Templates and choose Import...:
After doing this, you test press ctrl + space in your js/html files and start writing your test.
The following templates are available:
- Test - for general classes
- TestControl - for control tests without rendering
- TestRendering - for control tests with rendering