Step 2: 3D Viewer With Multiple File Loading
In this step, you will be creating a Viewer application that allows a user to load multiple 3D resources stored locally.
The controls in the sap.ui.vk library are currently flagged as experimental. For more information, see Compatibility Rules.
The content in this tutorial step references Step 1: 3D Viewer With Single File Loading for comparative purposes.

You can view and download all files in the Explored app in the Demo Kit at 3D Viewer - Step 2 - Multiple File Loading .
index.html
Update the index.html file to reference the multipleFiles namespace, which will be the namespace we'll use for the sample application in this step.
#!html<!DOCTYPE HTML>
<html>
    <head>
        <meta http-equiv="X-UA-Compatible" content="IE=edge">
        <meta http-equiv="Content-Type" content="text/html;charset=UTF-8"/>
        <script id="sap-ui-bootstrap"
            src="../../../../../../../../../resources/sap-ui-core.js"
            data-sap-ui-libs="sap.ui.vk, sap.m"
            data-sap-ui-theme="sap_bluecrystal"
            data-sap-ui-bindingSyntax="complex"
            data-sap-ui-resourceroots='{
                "multipleFiles": "./"
            }'>
        </script>
        <script>
        sap.ui.getCore().attachInit(function(){
            new sap.m.Shell({
                app: new sap.ui.core.ComponentContainer({
                    name : "multipleFiles"
                })
            }).placeAt("content");
        });
        </script>
    </head>
    <body id="content" class="sapUiBody">
    </body>
</html>
Component.js
Update the Component.js file to reference the namespace specified for this application.
#!jssap.ui.define([
        "sap/ui/core/UIComponent"
], function (UIComponent) {
        "use strict";
        return UIComponent.extend("multipleFiles.Component", {
        metadata: {
            manifest: "json"
        },
        init: function () {
            // call the init function of the parent
            UIComponent.prototype.init.apply(this, arguments);
        }
    });
});
i18n.properties
In the i18n.properties file, we have labels for the toolbar, the page title, the three input fields, the Load button, and the error message that is displayed when the user attempts to load a model without specifying one to load.
#!properties
# App Descriptor
appTitle=App title
appDescription=This is a description coming from the i18n as specified in manifest.json

# Viewer Descriptor
viewerToolbarTitle=Upload multiple files

# Page Descriptor
pageTitle=Multiple File

# Form Descriptor
formRemoteURL1=Remote Model URL 1
formRemoteURL2=Remote Model URL 2
formRemoteURL3=Remote Model URL 3
buttonLoadModel=Load

# Message Toast
missingUrl=Please specify at least one URL
manifest.json
Update the manifest.json file so that it references the correct files.
#!js{
    "_version": "1.1.0",
    "sap.app": {
        "_version": "1.1.0",
        "id": "multipleFiles",
        "type": "application",
        "i18n": "i18n/i18n.properties",
        "title": "{{appTitle}}",
        "description": "{{appDescription}}",
        "applicationVersion": {
            "version": "1.0.0"
        },
    },
    "sap.ui": {
        "_version": "1.1.0",
        "technology": "UI5",
        "deviceTypes": {
            "desktop": true,
            "tablet": true,
            "phone": true
        },
        "supportedThemes": [
        "sap_bluecrystal"
        ]
    },
    "sap.ui5": {
        "_version": "1.1.0",
        "rootView": "multipleFiles.view.App",
        "dependencies": {
            "minUI5Version": "1.30",
            "libs": {
                "sap.m": {}
            }
        },
        "models": {
            "i18n": {
                "type": "sap.ui.model.resource.ResourceModel",
                "settings": {
                    "bundleName": "multipleFiles.i18n.i18n"
                }
            }
        }
    }
}
App.view.xml
This file specifies how the page in the application will be laid out. We only have one formElement in the form container, which contains the fields for loading 3D resources that are stored locally. In the element, we have specified three input text fields and one button for loading. The labels to use for each of the fields are specified in the text attributes.
#!xml<mvc:View
   controllerName="multipleFiles.controller.App"
   xmlns="sap.m"
   xmlns:mvc="sap.ui.core.mvc"
   xmlns:vk="sap.ui.vk"
   xmlns:l="sap.ui.layout"
   xmlns:f="sap.ui.layout.form"
   xmlns:u="sap.ui.unified"
   displayBlock="true">
    <App id="multipleFiles">
        <Page
            title="{i18n>pageTitle}">
            <vk:Viewer
                id="viewer"
                toolbarTitle="{i18n>viewerToolbarTitle}"
                width="100%"
                height="85%"
                       />
            <f:Form editable="true">
                <f:layout>
                    <f:ResponsiveGridLayout/>
                </f:layout>
                <f:formContainers>
                    <f:FormContainer>
                        <f:formElements>
                            <f:FormElement>
                                <f:fields>
                                    <Input
                                           value="{source>/url1}"
                                           valueLiveUpdate="true"
                                           placeholder="{i18n>formRemoteURL1}">
                                        <layoutData>
                                            <l:GridData span="L12 M12 S12" />
                                        </layoutData>
                                    </Input>
                                    <Input
                                           value="{source>/url2}"
                                           valueLiveUpdate="true"
                                           placeholder="{i18n>formRemoteURL2}">
                                        <layoutData>
                                            <l:GridData span="L12 M12 S12" />
                                        </layoutData>
                                    </Input>
                                    <Input
                                           value="{source>/url3}"
                                           valueLiveUpdate="true"
                                           placeholder="{i18n>formRemoteURL3}">
                                        <layoutData>
                                            <l:GridData span="L12 M12 S12" />
                                        </layoutData>b
                                    </Input>
                                    <Button
                                            text="{i18n>buttonLoadModel}"
                                            press="onPressLoadRemoteModels">
                                        <layoutData>
                                            <l:GridData span="L2 M2 S2" />
                                        </layoutData>
                                    </Button>
                                </f:fields>
                            </f:FormElement>
                        </f:formElements>
                    </f:FormContainer>
                </f:formContainers>
            </f:Form>
        </Page>
    </App>
</mvc:View>
App.controller.js
Since we now have a different layout for the Viewer application compared to the sample Viewer application in Step 1: 3D Viewer With Single File Loading, we will need to change the logic for the application to accommodate for multiple file loading.
Add the checkIfAllInputsEmpty function to check whether the user has entered text into any of the input fields in the application. The checkIfAllInputsEmpty function returns the value true if the user hasn't entered any input at all, and the existing handleEmptyUrl function is called to display a message on the screen.
Update the onInit function so that we are specifying an empty data structure with three properties (url1, url2, and url3).
-
loadModelsIntoViewer - loads the models into Viewer
-
onPressLoadRemoteModels - handles the click event on the Load button
-
onPressLoadRemoteImage (since we are only loading 3D resources)
-
onChangeFileUploader (since we are not using the FileUploader control for this application)
#!jssap.ui.define([
    "sap/ui/core/mvc/Controller",
    "sap/ui/model/json/JSONModel",
    "sap/ui/vk/ContentResource",
    "sap/m/MessageToast"
], function (Controller, JSONModel, ContentResource, MessageToast) {
    "use strict";

    //throws a Message Toast alert on the screen
    //when the user tries to load a model but there's no url specified
    var handleEmptyUrl = function (view) {
        var oBundle = view.getModel("i18n").getResourceBundle();
        var msg = oBundle.getText("missingUrl");
        MessageToast.show(msg);
    };

    //checks if all URL input fields are empty or not
    var checkIfAllInputsEmpty = function (urls) {
        var allEmpty = true;
        for (var i = 0; i < urls.length; i++) {
            if (urls[i]) {
                allEmpty = false;
                break;
            }
        }
        return allEmpty;
    }

    //loads the models from the URLs into the viewer
    var loadModelsIntoViewer = function (viewer, urls, sourceType) {
        //clears all the models currently loaded in the viewer
        viewer.destroyContentResources();

        //iterates through all URLs
        //and loads all models into the viewer
        for (var i = 0; i < urls.length; i++) {
            if (urls[i]) {
                var contentResource = new ContentResource({
                    source: urls[i],
                    sourceType: sourceType,
                    sourceId: "abc"
                   name: urls[i].split("/")[2]
                });
                //add current model to the viewer
                viewer.addContentResource(contentResource);
            }
        }
    };
    return Controller.extend("multipleFiles.controller.App", {
        //when the controller is initialized,
        //we declare an empty structure and
        //we set this as model for the URLs
        onInit: function () {
            var sourceData = {
                url1: "",
                url2: "",
                url3: ""
            };
            var model = new JSONModel();
            model.setData(sourceData);
            this.getView().setModel(model, "source");
        },

        //onPressLoadRemoteModels handles the click event on the LOAD button
        onPressLoadRemoteModels: function (event) {
            var view = this.getView();
            //set the source model to a variable
            var sourceData = view.getModel("source").getData;

            //get the current viewer control
            var viewer = view.byId("viewer");

            //create the list of URLs from the input fields
            var urls = [sourceData.url1, sourceData.url2, sourceData.url3];

            //if all URL inputs are empty show an alert on the screen
            //if at least one URL is specified, then take the URL list
            //and load all existing ones into the viewer
            if (checkIfAllInputsEmpty(urls)) {
                handleEmptyUrl(view);
            } else {
                loadModelsIntoViewer(viewer, urls, "vds");
            }
        }
    });
});
Testing the Application
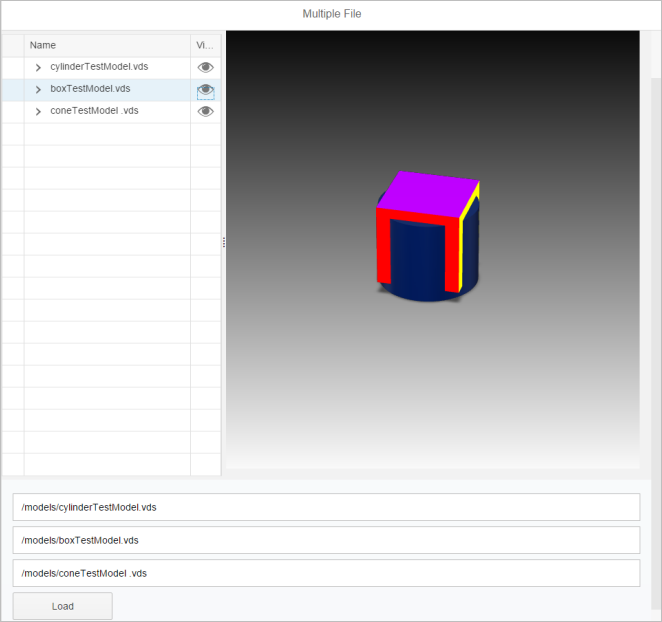
To test that the application works, we will load three 3D resources into the Viewer application.
- boxTestModel.vds
- coneTestModel.vds
- cylinderTestModel.vds
Type in the file path of the VDS files into each of the input text fields, and click on the Load button to load the 3D models. Your screen should look like the following screenshot: